
Whether you’re heading back to the gym after a long period away or you’re braving the weight room for the first time, figuring out what actually to do once you hit the gym can be daunting. That personal trainer you worked with a few years ago had you do awesome exercises, but now that you’re striking out on your own, you might have no idea how to build your first workout program without someone else telling you what to do.

The good news is, as long as you know what your goals are and some weight training basics, you’ll be good to get started in the gym — be it a commercial gym or your personal home gym. This guide will help you figure out your workout goals and translate them into your first workout program. You’ll also get a four-week training program template that you can modify as desired to fit your own goals.
How to Build Your First Workout Program
- Establish a Goal
- Select a Workout Split
- Choose Your Exercises
- Choose Your Sets and Reps
- Learn About Progression
- One-Rep Max Calculator
- Put it All Together
Establish a Goal
When you’re starting your first training program — regardless of your experience level — it’s going to be most effective if you’re clear about your goals from the jump. You might be looking to build muscle, or you may be on the hunt for maximum strength. Your goals might also be related to cardiovascular endurance, weight loss, or a combination of multiple goals.
It’s okay if you’ve got more than one goal — people usually do. For example, even powerlifters (whose main goal is strength) often want to get more muscular. Still, you want to maintain some type of focus. To design a training program that will keep you most engaged in and happiest with your program, focus on your top priority goal.
Form a Habit
As a beginner, the main focus and goal of your program may be to form a consistent exercise habit. As such, your methods will depend less on the specific physical benefits they offer. Instead, figure out what kinds of exercises you like and base your program around movements that are enjoyable and sustainable for you. Once you have a strong training habit, you can get more specific.
All these goals leave a lot of room for creativity, but that creativity must be accompanied by training logic and know-how. That’s where programming gets blurry. Once you’ve got a handle on your main goal(s), you’ll be able to take a deep dive into the nitty-gritty of creating a training program.
Select a Workout Split
A workout split is how you decide to break up your program day by day. These splits determine what kinds of exercises you do and when you do them. This is a huge component of organizing your turning so you can manage your energy and recovery while making steady progress.
For example, unless you’re following a specific and advanced training regimen, you don’t want to squat super heavy two days in a row. Your central nervous system and the muscles involved in squatting will be shot).
Additionally, the way you go about your program day-to-day informs what goal you’re emphasizing. If you’re looking to gain muscle mass, you probably won’t design a program focused on steady-state running (though integrating running into your lifting program isn’t a bad idea if you know how to do it).
Days Per Week
There are many ways you can organize a workout split. That said, knowing how many days you’ll be training is a good start.
Training frequency is an important variable when you’re designing your workout program. Consider how often you want to work out in a week. Choose a frequency that’s realistic for your energy and time allotments. Because your muscles need rest to recover, three, four, and five-day splits are the most common.
The next step is figuring out what you’ll be doing each day. Your goal will dictate your split’s focus.
Muscle Group Split
If you’re looking to build muscle, you might consider focusing on particular muscle groups each workout — training your back and biceps on one day, your chest and triceps on another, and your legs and shoulders on the third and final day. You could also program an optional fourth cardio and core day.
This is a popular approach for bodybuilders, who aim to put on as much muscle as possible. Focusing on just two body parts per workout allows you to hit each muscle with more overall volume for optimal growth.
Exercise Split
When you’re trying to bolster strength, you might design a workout split that revolves around your major compound movements. So, you’d have one day centered around the bench press, another focused on the squat, and one on the deadlift. This is often how powerlifters design their programs.
If you want to include the overhead press, you can work it into its own day, as well. You can also pair your lower body movements together and your upper body movements together. All of your accessory work (exercises meant to strengthen your main lift of the day) will be built around those exercises.
Push-Pull-Leg Split
A slight variation of this method is called the push-pull-leg split, which is when you do an upper-body push day, a lower-body day, and an upper-body pull day. So, you’d perform the bench press on the push day, the deadlift on the pull day, and the squat on the leg day.
If you want to overhead press, you can also do that on the push day. This option is also are common among powerlifters since each day naturally emphasizes the deadlift, back squat, and bench press. You’ll choose your accessory exercises accordingly, depending on whether they fall under the category of push, pull, or leg-oriented work.
Choose Your Exercises
Once you have your split worked out, you need to pick which exercises you’ll do each day. The exercises you choose for your program should reflect your primary goals.
If you’re an aspiring powerlifter or strength athlete, build your training around the big barbell lifts in your sport. All your other exercises (called accessory or assistance exercises) will support those lifts.
Athletes who want to build muscle will still benefit from performing those basic compound movements. In general, the bigger the movement, the more muscles you’ll be recruiting. But for muscle growth, you’ll also need more exercise variety to give each muscle the attention it needs to grow.
Compound Exercises
To develop a firmer understanding of your choices of exercises, it helps to be familiar with the components of compound exercises. These movements are multi-joint and require ample neural drive, mental focus, coordination, technique, and muscle recruitment. Think deadlifts, squats, clean & jerks, and overhead presses.
For these reasons, you should program these movements at the beginning of your workout. Otherwise, you’ll be fatigued and perform them with lackluster form (which can possibly lead to injury). Below are some of the most fundamental compound exercises you might choose to start your workouts with.
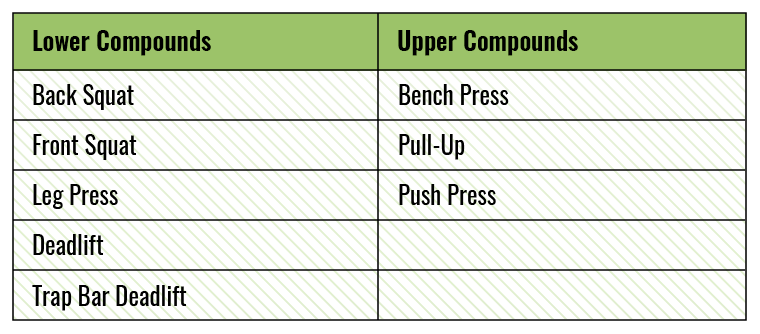
Compound movements are what give you the most bang for your buck in training, so you must put most of your energy and focus into strengthening them. Not to mention, if you’re a prospective competitive strength athlete, then these movements need to be strong because they’re your competition movements.
Accessory Movements
Accessory lifts are less demanding movements that help create balance in your body. They complement your compound exercises.
These movements involve one joint, such as barbell curls, lateral raises, and triceps pushdowns. Athletes use accessories to improve upon weaknesses and muscular imbalances. These moves also add extra volume to targeted muscle areas.
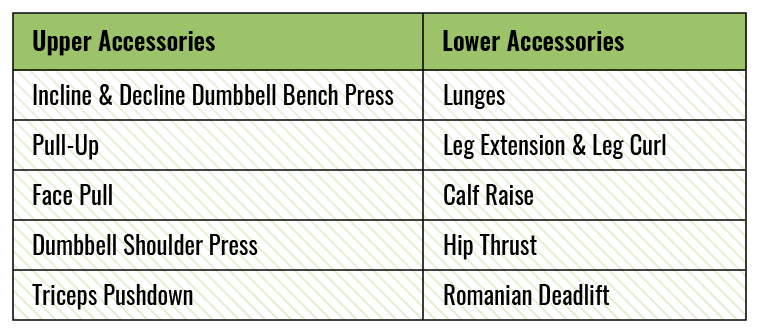
For those who want to build muscle, accessory exercises are as important as compound lifts. Above are examples of upper body and lower body accessory movements.
Different athletes and strength sports will require different accessory lifts, but when you’re just starting out, it’s important to get a broad understanding of what moves are available to you.
How to Program Your Exercises Into Your Workout Split
In short: After your warm-up, start each workout with compound exercises to bolster strength and recruit the most muscles. Yes, do this even if your main goal is building maximum muscle mass.
Complete your workout with accessory movements to support your strength gains and isolate smaller muscles. When you want to build muscle or if you simply enjoy variety, you can plan to incorporate more accessory exercises.
Below are two examples of how you may structure a strength-focused and hypertrophy-focused workout (sets and reps are not included, but they will be discussed below).
Upper-Body Push Day Example
- Barbell Bench Press
- Barbell Overhead Press
- Neutral-Grip Dumbbell Bench Press
- Half-Kneeling Dumbbell Overhead Press
- EZ-Bar Skull Crusher
- Dummbell Rear Delt Flye
- Side Plank
Leg Workout Example
- Front Squat
- Romanian Deadlift
- Reverse Lunge
- Leg Extension + Leg Curl Superset
- Standing Calf Raise
- Hanging Leg Raise
[Related: The Dos and Don’ts of Assistance Training]
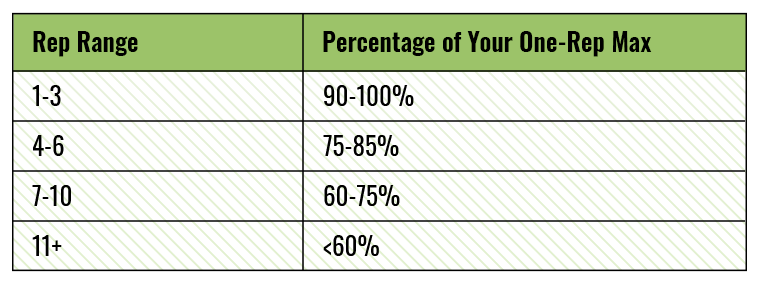
Choose Your Sets and Reps
Repetitions — or reps as they’re commonly called — are the number of times you perform a certain exercise. A set is how many times you do those repetitions. So, if a program tells you to do three sets of 10 reps for biceps curls, you’ll curl the weight 10 times, rest, and repeat two more times.

Certain goals require specific rep ranges. For strength, a lower rep range allows you to lift heavier weight. For muscle growth, working in the six to 12 rep range can yield enough time under tension to grow your muscles. Go much higher than that and expect to be looking at more endurance-oriented gains. Check out our rep chart above.
Rest Between Sets
It’s not all about how many reps you do, though. Rest is an important factor in a well-designed program and can also be used as a training tool. You can use rest times as a way to track progressive overload when working towards a goal.
For example, resting less in between sets can help increase your muscular endurance. Keep tabs on your rest times to track how much better you’re getting over time.
There are multiple ways to assess how long you should rest, but the general rest times below are a good rule of thumb. These ranges will coincide with how the body’s energy systems will respond to various movements and intensities, along with giving them adequate time to recover.
- Compound Movements: 2 to 4 minutes
- Accessory Movements: 45 seconds to 90 seconds
It doesn’t make you cooler to rest for shorter amounts of time, and it doesn’t make you less fit to rest for longer amounts of time. If you’re using very heavy weights with compound movements, let your body recover accordingly between sets.
When you’re using lighter weights with accessory movements, challenge yourself to stick to the quick rest periods if you can. Three to four sets are generally good to start with when you’re first beginning a program, and those rest periods will add up — so make sure you’re accounting for rest time when you’re planning out your gym time.
Learn How to Progress
You have a goal in mind, a workout split laid out, and your exercises are chosen along with set and rep schemes for each. That’s great. But now you need to ensure that you’re progressing workout to workout — otherwise, you’ll stay stagnant. Enter progressive overload — the method of making your workouts slightly more challenging each session.
There are multiple ways to progress, but the two most common are increasing the reps and/or weight you’re lifting.
Here’s a simple example: Say you’re curling a barbell for three sets of 10 reps with 60 pounds. During your next workout, do three sets of 11 reps. Then, do three sets of 12 reps and then 13 reps. After four weeks of upping the rep count, add five pounds to the barbell and then start all over at three sets of 10 reps.
That method can be applied to every exercise throughout your beginner program. As you get more experienced, you’ll find other ways to increase your intensity and fight through plateaus.
A Word on Intensity
Intensity refers to the amount of effort you put into a lift, measured by both the weight on the bar and the number of reps you perform. You’ll see this word tossed around a lot, and that’s because intensity determines a lot of factors in your workouts — namely your sets and reps, overall training volume, and rest times.
There’s an inverse relationship between the weight on the bar and the number of reps you perform. The more weight you lift, typically measured using a percentage of your one-rep max, the fewer reps you’ll perform.
But intensity also doesn’t just equate to more weight. A 20-rep squat set can be just as intense as a heavy one-rep max squat, and both require ample amounts of rest between sets. So, remember: A heavy, heavy lift for few reps can require as much rest as a lighter lift done for many reps.
One-Rep Max Calculator
To help you figure out how to gauge your intensity, take advantage of BarBend‘s one-rep max calculator. Here, you’ll be able to assess which weights to use in your first workout program. Since you likely won’t be actually maxing out as a beginner, you can use this calculator to assess your starting point and build out your programming from there.
One Rep Max Calculator
In general, the lower your rep range, the higher your lifting percentage will be. So, you’ll perform four to six reps with a higher percentage of around 75 to 85 percent of your one-rep max. Conversely, when you’re doing more than 11 reps, you’ll generally use 60 percent or less of your max.
[Related: How to Use the RPE Scale For Strength Training]
Put It All Together
Once you understand different movements and variables that construct a sound program, it’s time to begin building: AKA, the fun part.
Full disclosure: this article is intended to help an athlete build a basic workout template and will most likely not be the best bet for those heavily involved in a specific strength sport like CrossFit or strongman.
Still, the skills you learn here can be scaled and translated into more sports-specific training regimens.
Choosing a Timeline & Periodization Scheme
When you’re planning out or periodizing your program, there are three cycles (also called blocks) to break down training timelines. These are a microcycle (smallest), a mesocycle (middle), and a macrocycle (overview).
Coaches will use these timelines, cycles, or blocks to help dictate their workouts per an athlete’s needs, goals, and sport. That said, it’s good to have a solid understanding of what all this means and how to use it for yourself. Check out the visual example below.

There are multiple types of periodization programs, but beginners are often served best by a linear model. This model will support consistent calculated growth over a gradual period of time.
The example program outlined below will be a month-long mesocycle with a program that corresponds to the linear periodization model. Basically, it’s four weeks of workouts, with each workout containing a slight progressive overload on each of your movements.
Sample Program Template
Here, you’ll find a skeleton training program template that will have you training three times a week. You can add a day if you’d like, and if you choose to do so, you might want to look into working with an upper/lower split.
Directions: All exercises should be performed one at a time. However, exercises marked with the same letter (“C1” and “C2”) should be performed back-to-back without rest as a superset. Your goal is to hit the sets and reps as listed, adjusting your weights as needed if you’re finding this way too easy or way too hard. Also, be sure to rest one day between training days.
Note: You’ll notice that there are no exercises listed below. That’s by design. It’s up to you to choose the best exercises based on your training goals. This template lets you know where to plug in compound and accessory movements and gives you set and reps, but that’s it. Consider this homework — but homework that’ll get you jacked.
Week One
Day One — Leg Focus
- A1. Lower Compound: 4 sets of 6 reps / 70% 1-RM
- B1. Lower Accessory (unilateral focus): 3 sets of 8-10 reps
- C1. Lower Accessory: 3 sets of 12-15 reps
- C2. Core Accessory: 3 sets of 15-20 reps
- D1. Weighted Core Accessory: 2 sets of 10-12 reps
Day Two — Upper Body Focus
- A1. Upper Compound: 5 sets of 5 reps / 70% 1-RM
- B1. Upper Accessory: 4 sets of 8-10 reps
- C1. Upper Accessory: 3 sets of 6-8 reps
- C2. Upper Accessory (optional: arm focus): 3 sets of 10-12 reps
- D1. Upper Accessory (arm focus): 3 sets of 6-8 reps
- D2. Core Accessory: 4 sets of 10-15 reps
Day Three — Lower Body Focus
- A1. Lower Compound: 3 sets of 5 reps / 75% 1-RM
- B1. Lower + Back Accessory: 3 sets of 6-8 reps
- C1. Lower + Back Accessory: 3 sets of 10-15 reps
- C2. Upper Accessory: 3 sets of 6-8 reps
- D1. Weighted Core Accessory: 4 sets of 8-10 reps
Week Two
Day Four — Leg Focus
- A1. Lower Compound: 4 sets of 6 reps / 72.5% 1-RM
- B1. Lower Accessory (unilateral focus): 3 sets of 8-10 reps
- C1. Lower Accessory: 3 sets of 12-15 reps
- C2. Core Accessory: 3 sets of 15-20 reps
- D1. Weighted Core Accessory: 2 sets of 10-12 reps
Day Five — Upper Body Focus
- A1. Upper Compound: 5 sets of 5 reps / 72.5% 1-RM
- B1. Upper Accessory: 4 sets of 8-10 reps
- C1. Upper Accessory: 3 sets of 6-8 reps
- C2. Upper Accessory (optional: arm focus): 3 sets of 10-12 reps
- D1. Upper Accessory (arm focus): 3 sets of 6-8 reps
- D2. Core Accessory: 4 sets of 10-15 reps
Day Six — Lower Body Focus
- A1. Lower Compound: 3 sets of 5 reps / 77.5% 1-RM
- B1. Lower + Back Accessory (ideally back focus): 3 sets of 6-8 reps
- C1. Lower + Back Accessory: 3 sets of 10-15 reps
- C2. Upper Accessory: 3 sets of 6-8 reps
- D1. Weighted Core Accessory: 4 sets of 8-10 reps
Week Three
Day Seven — Leg Focus
- A1. Lower Compound: 4 sets of 6 reps / 75% 1-RM
- B1. Lower Accessory (unilateral focus): 3 sets x 8-10 reps
- C1. Lower Accessory: 3 sets of 12-15 reps
- C2. Core Accessory: 3 sets of 15-20 reps
- D1. Weighted Core Accessory: 2 sets of 10-12 reps
Day Eight — Upper Body Focus
- A1. Upper Compound: 5 sets of 5 reps / 75% 1-RM
- B1. Upper Accessory: 4 sets of 8-10 reps
- C1. Upper Accessory: 3 sets of 6-8 reps
- C2. Upper Accessory: 3 sets of 10-12 reps
- D1. Upper Accessory (arm focus): 3 sets of 6-8 reps
- D2. Core Accessory: 4 sets of 10-15 reps
Day Nine — Lower Body Focus
- A1. Lower Compound: 3 sets of 5 reps / 80% 1-RM
- B1. Lower + Back Accessory (ideally back focus): 3 sets of 6-8 reps
- C1. Lower + Back Accessory: 3 sets of 10-15 reps
- C2. Upper Accessory: 3 sets of 6-8 reps
- D1. Weighted Core Accessory: 4 sets of 8-10 reps
Week Four
Day 10 — Leg Focus
- A1. Lower Compound: 4 sets x 6 reps / 77.5% 1-RM
- B1. Lower Accessory (unilateral focus): 3 sets x 8-10 reps
- C1. Lower Accessory: 3 sets x 12-15 reps
- C2. Core Accessory: 3 sets x 15-20 reps
- D1. Weighted Core Accessory: 2 sets x 10-12 reps
Day 11 — Upper Body Focus
- A1. Upper Compound: 5 sets of 5 reps / 77.5% 1-RM
- B1. Upper Accessory: 4 sets of 8-10 reps
- C1. Upper Accessory: 3 sets of 6-8 reps
- C2. Upper Accessory (optional: arm focus): 3 sets of 10-12 reps
- D1. Upper Accessory (arm focus): 3 sets of 6-8 reps
- D2. Core Accessory: 4 sets of 10-15 reps
Day 12 — Lower Body Focus
- A1. Lower Compound: 3 sets of 5 reps / 82.5% 1-RM
- B1. Lower + Back Accessory (ideally back focus): 3 sets of 6-8 reps
- C1. Lower + Back Accessory: 3 sets x 10-15 reps
- C2. Upper Accessory: 3 sets of 6-8 reps
- D1. Weighted Core Accessory: 4 sets of 8-10 reps
The Big Picture
There are a million ways to get from point A to point B in the world of strength training. There’s never a one-size-fits-all methodology. What’s most important is understanding the “why” when you’re in the gym. By sizing up your goals and programming exercises and intensities to match, you’ll be well on your way to gym happiness.
Featured Image: Prostock-studio / Shutterstock