
Since I covered some cool variations on the squat, bench, and deadlift, I think it’s only fair that I do the same for some of the major body parts, starting with everyone’s favorite: Arms. Actually, exercise selection is crucially important for effective arm training.
Since you probably aren’t (and shouldn’t be) hitting them with insane volume, you have to make the work you do do really count. Here are some variations on popular arm exercises you can try to jumpstart your guns’ growth!
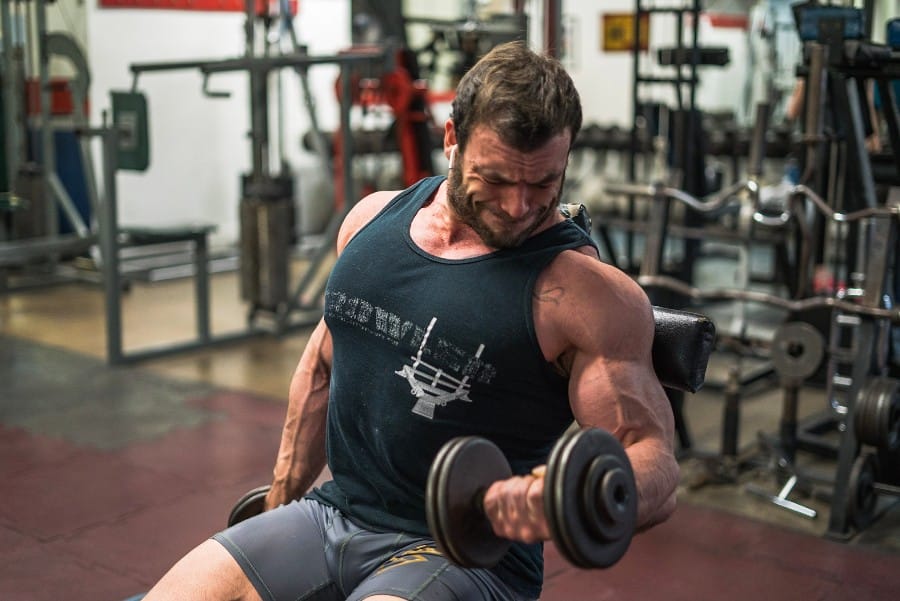
1. 1-Arm Tate Presses
Regular Tate presses (named for the great Dave Tate, in case you were wondering) are sometimes called elbows-out dumbbell extensions, and they’re a great way to strengthen your bench lockout, since you can use a fairly heavy weight with them.
However, the reason you can use a heavy weight with regular Tate presses involves leverage. By angling the dumbbells against each other at the bottom of the movement, you cut some of the range of motion, and it’s even possible to generate a little bit of momentum if you get the rhythm right. That’s great if you’re using them as a bench accessory. It’s not so great if you’re trying to get huge triceps.
For the latter goal, we want to use a full range of motion and a very controlled eccentric. That’s a lot easier with Tate presses if you perform them using only one arm a time, like this:
- Position yourself on a flat or incline bench as if you were going to do a bench press, but don’t retract your scapula or arch your back.
- Grab a light dumbbell (I use 25-30 pounds) in one hand and hold it at arm’s length (again, just as if you were performing a one-arm dumbbell bench presses).
- Slowly lower the dumbbell towards your opposite shoulder, keeping your wrist neutral, and your elbow pointed directly at the ceiling. You can use your opposite arm to support your working arm by placing your other hand on the inside of your elbow joint.
- Lower the dumbbell as far as possible. You may need to lift the shoulder of your working arm a bit off the bench – that’s okay. Keep your lats relaxed so that they don’t restrict your movement.
- Reverse the motion, extending your elbow until your arm is straight.
This exercise will blow up the outer head of your tricep, giving you that nice, thick horseshoe shape.
2. Reverse-Grip Dumbbell Kickbacks
Dumbbell kickbacks get a bad rap. The logic goes something like this: because they don’t allow to use a lot of weight in the first place, they’re not great mass builders, and they’re really hard to train progressively. I believed that kind of logic for a long time because, hey – it makes sense.
Here’s the thing, though: not all of your training needs to be progressive. There is a lot to be said for techniques that allow you to do things like learn to use your body in different ways, relieve stress, or build a massive pump. Now, reverse-grip dumbbell kickbacks probably aren’t going to relieve a lot of stress in your life, but they very well could accomplish the other two things I just mentioned.
First, the reverse grip allows you to more easily target the long head of your triceps, which is the largest of the three and so contributes the most to overall triceps size. Most people can easily recruit their long head when training movements that have the weight overhead (like overhead dumbbell or rope extensions), but once you learn to feel that particular part of the muscle working in other applications, it gets easier and easier to build up with a variety of different exercises.
Second, the position of your arm in the dumbbell kickback allows you to really squeeze the heck out of your triceps. That means, especially when you do them for high reps, that kickbacks can give you a massive pump. Besides looking cool and feeling good, some research suggests that the pump can contribute to muscle growth.
Kickbacks shouldn’t be the meat and potatoes of your arm training, but combined with heavier movements like close-grip bench presses and skullcrushers, they can be a real winner.
3. Seated Barbell Curls
I actually first read about these in a book called Beyond Brawn by Stuart McRobert. Terrible book – it led to over a year of wasted training for me – but these are a cool exercise nonetheless.
Performing a seated barbell curl is almost as simple as it sounds. The movement is essentially a partial curl, because your legs prevent the barbell from going down past the point where your elbows are bent about 90 degrees. There are a couple of performance points to note:
- You should lean forward just slightly to limit the involvement of the front deltoids.
- Allow your elbows to come forward as you perform the motion, so that they remain directly under the barbell.
- Try to maintain constant tension on the biceps – don’t curl up so much that your elbows are completely closed.
Unlike a regular barbell curl, this movement allows you to use a fair amount of weight without allowing you to cheat. You’ll find pretty quickly that it’s very difficult to create any sort of momentum at all from the seated position. The partial range of motion is also a nice way to change things up if you’ve stalled with regular BB curls.
4. Banded Concentration Curls
Regular concentration curls are one of my favorite biceps exercises, but they’re one of those movements where the beginning part of the range of motion is much harder than the end. Any time you’ve got an exercise where that’s the case, you should consider adding bands to provide accommodating resistance during the easier part.
Westside Barbell (the program that popularized the use of accommodating resistance in powerlifting) recommends that when you do add bands or chains, you use them to add about 10-15% of your 1RM to the weight on the bar for exercises like the squat, bench, and deadlift. Now, since you probably can see the problem: 10-15% of your 1RM concentration curl isn’t a lot of weight. Don’t get too hung up on that, though: we actually only want to add a very small amount of resistance to the very end of the range of motion. Otherwise, we’ll be making the movement way to hard to perform for the high reps that we want.
So, start with the lightest band you can find (I use Elitefts micro bands). Position one end of the band around the dumbbell handle so that the band is totally slack at the bottom of the curl – where the movement is already the hardest – and provides a noticeable, but not huge, amount of resistance at the top of the curl. That might take a little experimentation, but it shouldn’t be too hard. You can use your foot to anchor the other end of the band.
Then, rep away!
Editor’s note: This article is an op-ed. The views expressed herein and in the video are the author’s and don’t necessarily reflect the views of BarBend. Claims, assertions, opinions, and quotes have been sourced exclusively by the author.
Feature image provided by Ben Pollack.