
Your muscles respond to training stimulus, and unless you have an awesome home gym, you’re sorely missing your favorite stimuli right now (think barbells). So when you’re training your lower body at home with no equipment, you need to start thinking even more creatively about muscle growth and strength.
Your type-II muscle fibers — the ones you use to bust out your 1RM squat — respond well to heavy loads, but they also respond great to explosive plyometric work and working to failure. That’s exactly what you’re going to do with these equipment-free lower body hypertrophy moves.
While you’re doing your explosive work, keep in mind that before you can develop power, you need to lock in excellent form. So as you’re going through the movements, don’t sacrifice form for speed.
Similarly, while plyometrics are going to be extremely important, so is helping your body move in ways you might neglect while you’re in the gym. Sticking to limited variations of competition lifts might be super helpful when prepping for competition, but you’ll need to give your body more variety when you don’t have the added stimulus of a loaded barbell on your back. By bringing unilateral and lateral moves into the mix, as well as squat variations you’re probably not used to, you’ll be making sure to give your lower body plenty of new lifting stimuli, even in the absence of weights.
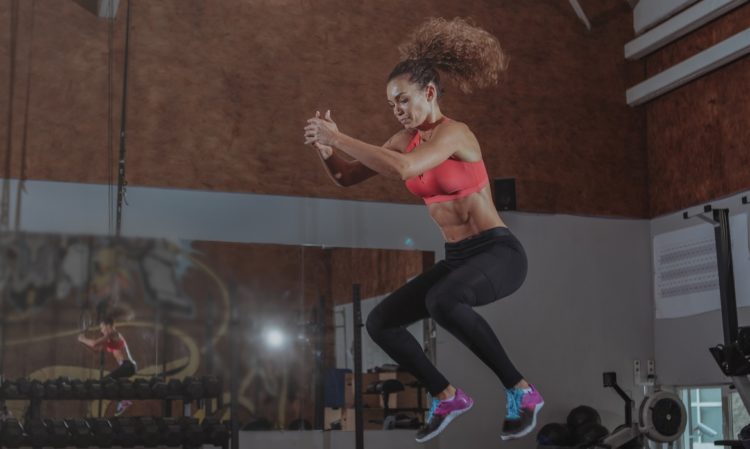
1. Squat Jumps
It’s going to be tempting to tilt your torso forward on these, because you’ll be able to feel like you’re going lower faster — but that won’t really do much for your legs, plus you’ll be ingraining a good morning squat pattern (which you’re really not trying to do).
Instead, focus on being explosive but controlled at the same time — sink fully into your squat, then explode up. Rushing the process will eat into your results (unless, of course, you can’t go to depth or are trying to be quiet for downstairs neighbors — results are relative, folks, so always do what’s best for you).
But all things being equal, the broader your range of motion, the more muscle fibers you’ll engage and the more attention you’ll be able to pay to proper form. Rest amply and as needed between each set, because you’ll be able to crank out more good reps that way.
Training Recommendation
3 rounds AMRAP (as many reps as possible with good form) for 90 seconds each
[Related: 3 supersets to help you maintain power without a gym]
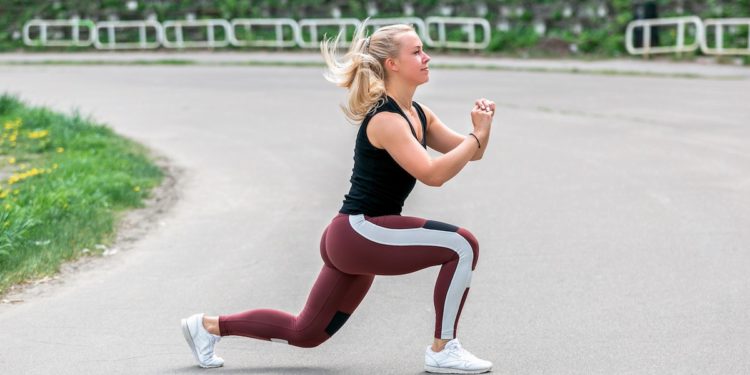
2. Lunge Jumps
Follow the same guidelines with these lunge jumps than you do with the squat jumps — yes, the idea is to be dealing in plyometrics, but you also want to make sure you don’t trade form for explosivity.
Focus on keeping your reps clean — if that means your plyometrics are less, well, plyo-ish, at first, then that’s alright. You want to train your body to be powerful in solid positions, not hack it with decent power and terrible form (it’s a recipe for disaster).
Training Recommendation
3 rounds AMRAP for 60 seconds each (alternating sides)

3. Explosive Plank to Squat
Start in a full plank (palms under your shoulders, AKA pushup position) with your core actively engaged and your spine neutral. Engage your lats by imagining you’re dragging your hands along the floor toward your knees (by don’t actually move your hands). Follow the direction of this motion by launching yourself out of plank position and into a squat.
If you need to progress up to this, that’s more than okay — keep your hands on the ground longer to keep your bodyweight stable as you transition into a squat, or step one foot up into squat position at a time. Whatever works for your body right now.
Training Recommendation
3 rounds AMRAP for 60 seconds each
4. Donkey Kicks
This will work your shoulders and lats more than you think it will, so make sure your shoulders and upper back are warmed up and ready before you kick into this move (see what I did there?).
Once again, you’re going to start in plank position. Bend your knees (a little like you’re prepping to jump up into a squat for, say, a burpee) and screw your hands into the ground to stabilize your shoulders.
Either one foot at a time, or with both feet (depending on your experience and comfort level), kick off from the ground and try to get your feet as high into the air as they’ll go. Stabilize your weight as much as possible on your hands — the idea is to activate your core and make a soft transition into landing, rather than slamming back down all willy-nilly.
Training Recommendation
3 rounds AMRAP for 60 seconds each

5. Hill Sprints
Unless you’re into that kind of pain, the mere idea of sprinting may well be painful for you. Hill sprinting? I feel you. But, it’s also pretty awesome.
Don’t jump into hill sprints (or sprinting in general) if you don’t already have a decently solid cardiovascular base.
You also need to make sure your running form is on point (which includes your ability to breathe, to keep your chest up, and avoiding the violence that is heel striking). But if you’re ready to go for it, hill sprints are an excellent way to maintain and even build solid lower body strength.
Training Recommendation
run (the steeper the hill, the less likely you’ll actually be to hit an actual sprint, but that’s okay) up a steep, moderately-sized hill, and walk back down between 5-7 times
View this post on Instagram
6. (Assisted) Pistol Squats
Can’t do the (in)famous one-legged pistol squat? No problem. If you’ve got a spare bed sheet or a low-seated chair, you can modify the move to do a (still super challenging) assisted version.
Tie a big knot in the bed sheet and secure it by tossing it over a door and then closing said door. Make sure the darn thing is stable before continuing! When it is, gently hold the end of the sheet like it’s a TRX band and lower yourself into a one-legged squat, letting your off-the-ground leg straighten as much as it can in front of you. It’s totally alright to tug the sheet for a lot of support — progressions involve using the sheet for support less and less (gripping it less tightly, using your arms for stability a lot less).
If you’ve got a low-seated chair and want to do assisted pistol squats that way, go through the same procedure — stick one leg out in front of you and descend into a squat (but with… one leg). Bring your butt down all the way to the chair (it’ll catch you if you lose balance) — if you need to, fully sit down before bracing and pushing the ground away with your foot to stand back up.
Training Recommendation
3 sets to failure per side
[Related: At home options for inverted rows]
7. Quad Press
Sit into your deepest squat and then let yourself fall (with precise control) forward onto your hands, so you’re roughly in a plank position but with your legs curled underneath you.
Walk your feet out a little bit so your knees are a little farther apart and you can sink down deeper into the position. Lower your bodyweight down onto your hands and your quads, trying at first to distribute the weight evenly across your whole body.
As you get more comfortable with the movement, shift the press so the weird-looking pushup puts more emphasis on your quads than your upper body. You may need some trial and error to find the exact position that will be most effective for your body, but you’ll feel it in your quads when you get it right.
Training Recommendation
3 rounds AMRAP for 90 seconds each
Like this, but you’re pausing midway.
8. 1.5 Bulgarian Split Squats
Grab a very stable chair and bring your back foot to rest on it, laces down, while the rest of your body faces away from the chair.
Situate your front leg so you can sink into a lunge where your foot will track over your knee and you can get good flexion from your back leg.
Press the ground away with your front foot and start to rise out of the split squat — but stop about midway up. Hold in this half rep position for a second, then descend back down to the bottom of the rep again. This time, you can come all the way up to standing. That’s a full (1.5) rep. Switch legs and make sure to keep the number even on both sides.
Training Recommendation
3 sets to failure per side
9. Pause Squats
But here’s the thing — don’t do your pause all the way down in the hole. Find that spot where your legs give you most resistance — for many people, it’s at about parallel, or wherever your squat reaches a sticking point when you’re under a loaded barbell — and linger there.
Training Recommendation
5 reps to failure
10. Yoga Squats
Bring your feet together (or pretty darn close to it), extend your arms out in front of you for balance, and… squat.
As you probably know from push-ups, planks, and the like, the closer your feet are together, the smaller your base of stability is. So when you’re doing a yoga squat, your center of gravity will be right over your base of support (instead of distributed more or less evenly between your hip-width feet when you squat normally). That will make balance much more difficult, and you’ll need to recruit more stabilizer muscles than you would just doing a regular old bodyweight squat.
Resist the temptation to collapse your chest forward to counterbalance the movement — that’s what you have your arms out for. If you need to do this next to a sturdy table or with hanging bed sheets to stabilize you in case you start to tip backwards, there’s absolutely no shame in that.
Training Recommendation
3 rounds AMRAP for 45 seconds each
Like this, but without weights or standing up between reps.
11. Sumo Iso-Squat Calf Raises
Set up with your feet wider than your normal squat width — take your time adjusting so that you can still sit down into a parallel but wide (sumo) squat while your knees are still tracking over your toes. Once you’ve found that position, sink into your sticking point. (Same like with a regular pause squat above — find the spot that gives your muscles the most trouble, and that’s your pause point.)
Your squat itself is going to remain isometric throughout your sets (so you’re not moving your thighs) — but you’re going to rise up as steadily and slowly as you can onto your tip toes. Doing calf raises while taxing your quads is going to help your body get more comfortable in ranges of motion it doesn’t normally train, and it’ll help you get some bodyweight calf moves that will engage your whole body.
Training Recommendation
4 rounds AMRAP for 75 seconds each
View this post on Instagram
12. Lateral Lunges
Stand with your feet together and then step your left foot out to the side. If you’re not used to doing lateral lunges, experiment a little bit until you find the sweet spot when you can hinge at the hips to squat all the way back (over your left leg) with your knees tracking securely over your toes. (Keep your left foot too close to your body, and your knee will collapse outward — too far away, and your thigh won’t be able to reach even near parallel.)
Keep your chest up and be patient with yourself if your range of motion is small at first. Switch sides, rinse and repeat.
Lunging side-to-side is going to help you develop the lateral stability you’ll need when you’re back under a heavy barbell and trying to do your walk out. It’ll also help you prevent a good morning squat by developing greater ankle flexibility, so really get after this one.
Training Recommendation
3 sets to failure per side
13. Single-Leg Glute Bridge
Lay on your back and prepare for a challenge rather than something you’ll just blow through without really thinking. Bend your knees out in front of you with your feet firmly planted on the ground.
Make sure your hips stay square throughout the entire movement. Using your core to activate the muscles (rather than just yanking your leg around), let your left foot leave the ground and extend your left leg straight out in front of you, keeping your hips square and your thighs aligned.
Push the floor away with your right foot and squeeze your glutes as you slowly, with intention, raise your hips as far as you can to the ceiling. Pause for a moment at the top of your range of motion and slowly descend.
Avoid touching the ground or just gently let your butt touch the ground before ascending again, keeping your left leg as straight as you can the whole time. Switch sides and repeat.
Training Recommendation
3 sets to failure per side
[Related: Glute bridge vs hip thrust – which is best for you?]
14. Glute Bridge March
Get into your glute bridge position, with your hips pushed as far up as they can be with your lats anchored on the ground (think prepping for your bench press) and your feet firmly on the ground.
Keep your arms resting at your sides. Once you’re stable at the top of your glute bridge, march it out. Lift your left knee so it comes closer to your body, stabilizing your weight on your right leg and keeping your hips square the whole time.
Slowly lower your left leg back down, plant your left foot, and repeat the movement with your right leg, “marching” your feet with your hips raised the entire time.
Training Recommendation
3 rounds AMRAP for 60 seconds each
15. Reverse Plank Pulses
Get into reverse plank position — sit on your butt with your legs straight in front of you. Place your hands roughly under your shoulders, with your fingers pointing back toward the wall behind you. Press the floor away with your hands and feet, squeezing your glutes to raise your hips as high as you can without hyperextending your back.
Keep your knees straight, and you’ll find yourself in a reverse plank position. You can hold it here or, if your arms feel stable, go through “pulse” reps by slowly lowering your hips back down, barely touching the ground, and then squeezing your glutes to press up again.
Training Recommendation
4 rounds AMRAP for 30 seconds each
[Related: 10 plank variations for a stronger core]
Work To Failure For Success
If you’re looking to build your lower body without weights, plyometric moves and slow, controlled bodyweight moves to failure are going to be your good friends. Make sure you’re not cheating these reps, and really focus on your form each and every time. Your lower body (and your squat and dead once you’re back in the gym) will thank you for your efforts.
Featured image via MAD_Production/Shutterstock