
You might be strong and muscular, but are you really getting the most out of your workout? If you’re not spending enough time each week on mobility training, you’re probably not reaping the full benefits of your workouts.
Gradually increasing your range of motion with the best mobility exercises out is not just about being flexible. Good mobility means that the range of motion is smooth, more resilient against injury, and better able to recruit the most muscle mass for each exercise. And the more muscle mass you can recruit, the more weight you’ll be able to lift.
If you’re interested in getting strong — and staying that way in the long term, mobility training is a must. Here, you’ll find the 20 best mobility exercises to help keep you in tip-top shape.
Best Mobility Exercises
- Kettlebell Arm Bar
- Lateral Lunge
- Half-Kneeling Arm Rotation
- Walking Spiderman With Hip Lift and Overhead Reach
- Three-Way Ankle Mobilization
- Seated 90/90 Hip IR/ER with Reach
- Back-to-the-Wall Shoulder Flexion
- Prying Squat
- Mini Band Overhead Reach
- Passive Leg Lowering
- Mini Band Prone Floor Slide
- Half-Kneeling Hip Flexor Stretch
- Tall-Kneeling Shoulder Controlled Articular Rotation
- Assisted Quadruped Thoracic Rotation
- Rocking Ankle Mobilization
- Active Frog
- Thoracic Rotation With Deep Lateral Kneel
- Lunge Rotation
- Deep Squat Rotation
- Crab Chest Stretch
Editor’s Note: The content on BarBend is meant to be informative in nature, but it should not be taken as medical advice. When starting a new training regimen and/or diet, it is always a good idea to consult a trusted medical professional. We are not a medical resource. The opinions and articles on this site are not intended for use as diagnosis, prevention, and/or treatment of health problems. They are not substitutes for consulting a qualified medical professional.
Kettlebell Arm Bar
The kettlebell arm bar is equal parts a stability and mobility exercise. Stability because it strengthens the entire shoulder girdle, especially the rotator cuff, and mobility because it helps unlock the thoracic spine.
When the thoracic spine lacks mobility, the lower back picks up the slack and you don’t want that, especially when deadlifting or squatting.
How to Do the Kettlebell Arm Bar
- Lie on your right side with your knees bent close to 90 degrees. Grab the kettlebell with two hands and roll to your left.
- Press the kettlebell up with two hands, then release your left hand to your side, about 30 to 60 degrees away from your body.
- Lift your right leg up and over to the left side of your body, keeping your right arm stable throughout the entire movement.
- With your right knee on the ground and bent at 90 degrees, raise your left arm overhead and rest your head in a neutral position on your left arm.
- Inhale through your nose and exhale through your mouth as you drive your hips deeper into the ground and then lengthen and reach with your right arm.
Coach’s Tip: Use a light kettlebell here. The goal is not to lift heavy, but rather to train your shoulder girdle to be both mobile and stable.
Sets and Reps: Perform two sets of 10 to 15 reps on each side, depending on your experience level.
Benefits of the Kettlebell Arm Bar
- This move improves shoulder stability and mobility.
- You’ll develop a greater ability to get overhead with less compensation from the lower back.
- The kettlebell arm bar can help you become more resilient against injury.
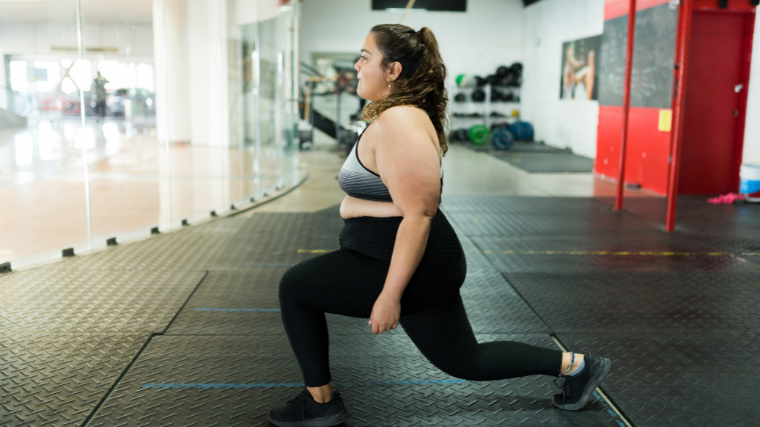
Lateral Lunge
Lateral lunges help develop strength, stability, and balance in the frontal plane, which improves your ability to go from side to side. Athletically, this is a helpful skill if you need to evade opponents without slowing down.
Plus, it improves your adductor mobility and strength, helping to prevent groin injuries and improving overall hip mobility.
How to Do the Lateral Lunge
- Stand tall with your feet together, toes pointed forward, and take a big step to the side with your left leg.
- Hinge your left hip back, keeping your right leg straight with your toes pointed forward.
- Aim to feel your right adductors (inner thigh) lengthening.
- Push your left foot into the ground and return to the starting position. Repeat on both sides.
Coach’s Tip: Don’t step out so far that you can’t get your knee to 90 degrees. On the other hand, don’t step so close to you that you can’t sink all the way down into a lunge. Take some time to figure out the right step size for your limb length.
Sets and Reps: Do two to three sets of eight to 15 reps per side.
Benefits of the Lateral Lunge
- This move strengthens and lengthens your adductors, which improves hip mobility and helps prevent groin strains.
- You’ll enhance your side-to-side movement and your agility.
- The lateral lunge strengthens and mobilizes the entire hip region.
Half-Kneeling Arm Rotation
Your shoulder joint is one of the more mobile joints in the body. It can rotate about 180 degrees thanks to the ball and socket design. It’s also one of the more vulnerable joints.
The half-kneeling arm rotation, done with a band, takes the shoulder through its full range of motion with some added resistance. As a result, you’re simultaneously improving your mobility and reinforcing that mobility by strengthening it.
How to Do the Half-Kneeling Elastic Arm Rotation
- Kneel on the leg (in a half-kneeling position) that’s farthest away from the resistance and use the outside hand to hold the band.
- Keep your elbow straight as you rotate your arm up and behind you.
- Rotate your hips as your arms from a T and then return to the starting position.
Coach’s Tip: Avoid letting your chest curl forward while keeping your shoulders back and down.
Sets and Reps: Perform two sets of 10 to 15 reps per side.
Benefits of the Half-Kneeling Elastic Arm Rotation
- The kneeling position helps with your hip and thoracic mobility, as well as your core strength.
- You’ll strengthen your upper back while stretching your chest, helping to improve posture.
- This is a great pre-rehab exercise to help you become more resilient against injury.
Walking Spiderman with Hip Lift and Overhead Reach
This is just about one of the best bang-for-your-buck mobility exercises you can do. This one movement really encompasses many movements, so you’re effectively warming up and engaging your entire body.
The walking spiderman with hip lift and overhead reach is a mobility exercise that targets the adductors, hip mobility, hamstring flexibility, hip flexor strength, and thoracic spine mobility. If you’re really tight on time and can only afford a few minutes to warm up, this is the move you should do.
How to Do the Walking Spiderman with Hip Lift and Overhead Reach
- Step into a forward lunge and bring both hands down inside the forward leg.
- Straighten both legs while your hands are on the ground then come back down and get into a deep lunge.
- Reach and rotate the arm furthest away from the forward leg with your eyes following your hands.
- Return the hand back to the ground and stand up and step through to the other side and repeat.
Coach’s Tip: There are a lot of moving parts to this one. Don’t rush. Take your time and breathe in alignment with each aspect of the exercise.
Sets and Reps: Do two to three sets of eight to 10 reps per side.
Benefits of the Walking Spiderman with Hip Lift and Overhead Reach
- This exercise is referred to as the ‘microwave’ because it warms you up in a hurry. Do just five reps on each side will have you ready to go.
- It targets ankle, hip, shoulder, and thoracic mobility all at once.
- This move can be done with no equipment and with minimal space, making it accessible wherever you are.
Three-Way Ankle Mobilization
You probably don’t think about it often, but your ankles are what connect your feet to the rest of your body. Whenever a person squats, runs, or jumps, it’s the ankle that’s supporting and helping to stabilize the body.
You’ll want to help mobilize these muscles to grant you more ankle mobility. For this, we like the three-way ankle mobilization, which flexes your knee forward and over the ankle to work the joint in three directions.
How to Do the Three-Way Ankle Mobilization
- Start in the half-kneeling position and hold a stick in front of you to take the balance out of the equation.
- Move in all three directions separately (straight ahead, inside, and outside), driving your knee forward without your heel coming off the ground.
- Repeat for reps. One three-way move counts as one rep. Keep it even on both sides.
Coach’s Tip: Drive your heel into the ground even as you’re pressing your knee forward.
Sets and Reps: Perform two to three sets of eight to 10 reps per side.
Benefits of the Three-Way Ankle Mobilization
- This move helps restore mobility to stiff ankles.
- Improved dorsiflexion leads to a deeper squat and better position in the deadlift.
- Increasing ankle mobility can help prevent ankle injuries.
Seated 90/90 Hip IR/ER with Reach
The seated 90/90 with IR/ER trains an important component of hip mobility — internal and external rotation. Without proper hip rotation, it’s difficult to balance and walk, let alone squat and deadlift.
A lack of hip internal rotation makes sports and activities like squats that need deep hip flexion difficult. The body will compensate for a lack of hip rotation, leading to injuries like possible hip injuries over time.
How to Do the Seated 90/90 Hip IR/ER with Reach
- Get into a seated 90/90 hip position, hold your hands together, and form a double chin to look at the ground.
- Bring your leg off the ground and straighten your knee as you bring it around in front of you.
- Reach this leg forward and then rotate it behind you with knee bent and off the ground and repeat.
Coach’s Tip: If this full range of motion and balance is too difficult, practice sitting comfortably in the 90/90 position first.
Sets and Reps: Do two to three sets of 10 reps per side.
Benefits of the Seated 90/90 Hip IR/ER with Reach
- Improvements in hip internal and external rotation lead to better movement and hip function.
- The ability to rotate efficiently at the hip joint is crucial for hip health and helps prevent injury.
- This move also teaches a tremendous amount of balance and coordination.
Back-to-the-Wall Shoulder Flexion
The back-to-wall shoulder flexion trains the shoulder blades to move around the ribcage without help from the lower back. This trains posterior pelvic tilt, a neutral neck position, and core stability while lifting your arms overhead.
Think of this exercise as a test. If you have compensations or you’re unable to touch your thumbs to the wall, you have no business overhead pressing.
How to Do the Back-to-Wall Shoulder Flexion
- Set up with your back against a wall and your feet roughy six to eight inches away from the base of the wall, depending on your limb length.
- Make sure your back is flat and your thumbs are pointed forward.
- Exhale and slowly raise your arms overhead as you try to touch your thumbs to the wall without compensation from your lower back.
- Return to the starting position and repeat.
Coach’s Tip: Press your lower back into the wall throughout the movement to avoid hyperextension.
Sets and Reps: Perform two to three sets of 10 to 15 reps.
Benefits of the Back-to-Wall Shoulder Flexion
- This move improves your ability to train overhead without compensations.
- When performed regularly and with good form, it improves your overhead shoulder mobility.
- Successfully performing this move can help determine if you’re ready for overhead movements like presses and overhead squats.
Prying Squat
Squat depth may be a touchy subject — but having solid hip mobility is pretty much always a good idea. The prying squat opens up your adductors, which can inhibit your hip abductors from engaging and from getting deep into your squat.
This drill trains your legs to stabilize your squat. It does so by actively driving your knees away from your elbows for deeper squat form and hip mobility.
How to Do the Prying Squat
- Hold a light dumbbell or kettlebell goblet-style.
- Set your feet in your preferred squat position. Keep an upright torso.
- Slowly squat down until your elbows come to the insides of your knees.
- Keeping your chest up and shoulders down, actively press your elbows into your knees.
- Rock from side to side. Hold for time. Stand back up.
Coach’s Tip: Try to avoid pronating your feet beyond 45 degrees. This will help engage your ankle mobility, as well.
Sets and Reps: Perform two to three sets of 15 to 45-second holds.
Benefits of the Prying Squat
- This move encourages a squat technique that allows you to get deeper while being safer.
- The prying squat improves adductor mobility for better overall hip mobility.
- It may help to prevent groin strains due to better adductor mobility.
Mini Band Overhead Reach
When you’re going overhead — with or without weight — it pays to avoid compensating with flared ribs or hyperextending your low back. The mini band overhead reach trains shoulder horizontal abduction, scapular protraction, retraction, and upward and downward rotation.
These actions are all crucial for safely lifting overhead. Plus, it’s a great exercise to engage your serratus anterior, which is important for shoulder health because it helps stabilize your shoulder and maintain your overhead range of motion.
How to Do the Mini Band Overhead Reach
- Wrap a mini band around both wrists with your arms by your sides. Keep your hands shoulder-width apart.
- Lock your ribcage down, engage your glutes, and press forward like you’re doing a bench press.
- Slowly raise your arms above your head. Reverse the movement. Reset and repeat.
Coach’s Tip: Avoid flaring your rib cage or hyperextending your lower back during your arm raise.
Sets and Reps: Perform two sets of 10 to 15 reps.
Benefits of the Mini Band Overhead Reach
- This move prepares your muscles and shoulder joints to lift safely overhead.
- You’ll train the serratus anterior, which is an important muscle for shoulder movement and health.
- The mini band overhead reach is an excellent low-impact warm-up or recovery exercise for overhead athletes.
Passive Leg Lowering
The passive leg lowering places one hip in flexion while your hamstring is stretched. Your opposite leg goes into flexion and extension while your core remains stable. Making your hips and legs do separate work is great for improving your hip mobility.
It also trains hip separation, where one hip flexes while the other extends. This is the basis of everyday locomotion and most single-leg exercises. This is why it’s a great warm-up drill on your lower body day.
How to Do the Passive Leg Lowering
- Lie in a supine position. Hook a resistance band around the middle of one foot.
- Flex both hips to 90 degrees. Hold the band in each hand.
- Pull the band down enough to engage your core. Lower your free leg to the ground slowly. Keep your banded leg stable.
- Lower your heel almost to the floor while keeping a neutral lower back.
- Return your banded leg to starting position. Repeat for reps. Switch sides.
Coach’s Tip: Make sure you’re moving slowly and with control throughout the entire set.
Sets and Reps: Do two to three sets of 10 to 15 reps per side.
Benefits of the Passive Leg Lowering
- This move boosts hip mobility and core stability at the same time.
- Passive leg lowering provides a resisted stretch of your hamstrings to help improve flexibility.
- You’ll train hip separation here, which is important for running and single-leg exercises.
Mini Band Prone Floor Slide
Performing prone floor slides with a mini band helps target your serratus anterior. Your serratus is an important muscle for shoulder health and for getting your arms overhead without pain.
Unlike the mini band overhead reach, being on the floor will provide you with feedback from the floor to ensure that you’re training the correct muscles.
How to Do the Mini Band Prone Floor Slide
- Lie down prone on your elbows.
- Wrap a mini band around both wrists. Place your elbows underneath your shoulders. Keep your head and chest up.
- Press your non-working elbow into the ground. Slowly slide your working arm forward until you reach a stopping point.
- Return to the starting position. Alternate reps on both sides.
Coach’s Tip: Engage your core throughout the movement to ensure that you’re not hyperextending your back.
Sets and Reps: Do two to three sets of 10 to 15 reps.
Benefits of the Mini Band Prone Floor Slide
- This move improves shoulder stability and mobility at the same time.
- You’ll train scapular protraction and retraction unilaterally to reduce imbalances between sides — this can translate into stronger lifts and reduced injury risk.
- By targeting your serratus and increasing its activation with the mini band, you’ll improve your ability to go overhead without compensations.
Half-Kneeling Hip Flexor Stretch
The half-kneeling position is a go-to for opening your hip flexors. When performed correctly — by properly engaging your glutes — you’ll feel the hip flexor magic.
This stretch will mobilize your hips and strengthen them unilaterally. In doing so, it can help strengthen your posture. Plus, you’ll get accustomed to this position as a core-centric, stability-boosting position to perform lifts from.
How to Do the Half-Kneeling Hip Flexor Stretch
- Kneel with your toes planted. Bring one leg forward, making sure your ankle is directly underneath your knee.
- Place your other knee directly underneath your hip.
- Squeeze your glute to bring your pelvis forward. Get ‘tall’ with your torso.
- Hold for the designated time. Repeat on the other side.
Coach’s Tip: Breathe throughout this movement. It can be especially tempting with hip-openers to hold your breath, but ensure that you’re breathing deeply and slowly.
Sets and Reps: Perform two to three sets of 15 to 45-second holds per side.
Benefits of the Half-Kneeling Hip Flexor Stretch
- This position improves hip flexor length and strength.
- You’ll improve your core stability and teach yourself to specifically activate your glutes unilaterally.
- You can perform this move between sets of squats and deadlifts to keep yourself mobile and ready to lift heavy.
Tall-Kneeling Shoulder Controlled Articular Rotation
The tall-kneeling shoulder controlled articular rotation (CAR) involves actively moving your shoulder joint through its greatest rotational range of motion. Moving through this range of motion has many benefits.
You’ll lubricate your shoulder joints before lifting, promote healthy tissue re-modeling, and train your shoulder stabilizers at the outer limits of its range of motion. All of this translates into healthier shoulders and more pressing power. Plus, being in the tall kneeling position has core stability and hip mobility benefits and will increase your kinesthetic awareness of when you’re using which muscle groups.
How to Do the Tall-Kneeling Shoulder Controlled Articular Rotation
- Get into a tall kneeling position.
- Engage your glutes and flatten your ribcage. With your working arm in a hang position, slowly perform a shoulder circle backward.
- Perform a shoulder circle forwards. Reset and repeat on the other side.
Coach’s Tip: Concentrate on feeling every part of the movement, making sure you’re moving from your shoulder girdle as much as possible. Keep your shoulders away from your ears as much as possible.
Sets and Reps: Do two to three sets of 10 to 15 reps per side.
Benefits of the Tall-Kneeling Shoulder Controlled Articular Rotation
- This move will lubricate your shoulder joint before hitting the weights.
- You’ll improve your shoulder strength at the outer edges of your range of motion.
- The tall kneeling position helps you perform these moves with better form because you’ll fall out of position if you’re using any other part of your body besides your shoulders to perform this movement.
Assisted Quadruped Thoracic Rotation
Assisted quadruped thoracic rotations help you learn to move your thoracic spine without moving your lower back. Being able to extend and rotate your upper back allows you to pin a barbell to your back, throw anything with power, and lift overhead without pain.
Having good thoracic mobility can help save your shoulders and lower back from a world of hurt. This thoracic mobility move uses a band to load the movement lightly and to cement your mobility gains with strength at your end ranges of motion.
How to Do the Assisted Quadruped Thoracic Rotation
- Get into a quadruped position with your knees under your hips.
- Attach a light looped band on a squat rack. Loop the other end of the band on your shoulder that is away from the anchor point.
- Put your non-working elbow (closest to the anchor point) on the ground. Put your other hand behind your head.
- Slowly rotate this arm with your eyes following your elbow. Go back and forth for reps. Repeat on the other side.
Coach’s Tip: Throughout the movement, keep your hips square to make sure the movement is not coming from your lower back.
Benefits of the Assisted Quadruped Thoracic Rotation
- This move helps improve thoracic mobility, which helps you rotate and extend your upper back — and translates into stronger lifts across the board.
- Performing this move with a band helps load the movement and cement your mobility gains.
- This variation locks in your lower back to ensure the movement comes from the thoracic spine — this helps ensure that you’re doing the exercise properly to maximize your improvement.
Rocking Ankle Mobilization
Dynamic stretches like the rocking ankle mobilization are great for prepping your joints for barbell lifts. Without paying attention to ankle mobility, your ankle’s ability to dorsiflex — pulling your toes up — often suffers during day-to-day activities. Certain footwear and even sitting in certain positions contribute to this issue.
Reduced ankle flexibility can impact your squat depth and make your knees very unhappy. Addressing and improving your ankle mobility with this simple-to-perform exercise will have a big impact on your gym performance.
How to Do the Rocking Ankle Mobilization
- Get into a push-up position. Hike up your hips and walk your feet a little bit in toward your hands.
- Position your left foot behind your right ankle. Rise up on your toes. Lean forward with your hands on the ground.
- Begin slowly rocking back so your right foot ends flat on the ground. Keep your right leg straight.
- Return to the starting position. Repeat for reps.
Coach’s Tip: Work to keep your ankle straight with your toes pointing forward instead of pronating or supinating (shifting out or in) during this move.
Sets and Reps: Perform two to three sets of 10 to 15 reps per side.
Benefits of the Rocking Ankle Mobilization
- This move improves your ankle mobility, which can improve knee health and your big lower body lifts.
- You’ll target ankle dorsiflexion, which is needed for proper squats and deadlifts.
- Better ankle mobility goes a long way toward keeping your knees healthy.
Active Frog
This move might look like hanging out on the floor, not doing all that much. But looks are extremely deceiving. The active frog is likely to take you well outside your comfort zone in terms of opening up through your hips.
You’ll sliding your knees out as wide as possible and also pressing your hips down toward the ground. In doing so, you’re putting yourself in a very exaggerated deep squat position, which will translate wel under a barbell. Pro tip: keep your feet straight to help get your ankles a nice stretch, too.
How to Do the Active Frog
- Get into a quadruped position with your knees under your hips and your hands under your shoulders.
- Lower your forearms to the ground with your elbows under your shoulders.
- Spread your knees as far apart as they can go.
- Press your hips into the ground as low as they can.
- Rock gently back and forth on your knees and forearms.
Coach’s Tip: You can stay up on your hands to better accommodate your stomach or chest and help yourself access a deeper range of motion in your hips.
Sets and Reps: Do one to two sets of 30 to 45 seconds of the small back-and-forth pulses.
Benefits of the Active Frog
- This movement will help open up through your hips in both a static and dynamic fashion.
- It’s relatively easy to track your progress in this movement — how far apart can your knees get? — which might help some athletes who like to document progress.
- The active frog simulates a very deep squat on the ground, so your squat pattern stands to improve a great deal.
Thoracic Rotation With Deep Lateral Kneel
For many athletes, tall kneeling seems easy enough. Adding a lateral aspect to it makes it a little bit more tricky, especially if balance isn’t your best friend. But adding a thoracic rotation to the mix is where the extreme challenge comes in.
You’ll be challenging your balance and your stability in the frontal plane — that is, in side-to-side movements. That’s especially valuable since most barbell exercises are performed up and down, rather than side-to-side. This will give three dimensions to your training, and your lifts will thank you.
How to Do the Thoracic Rotation With Deep Lateral Kneel
- Start by getting into a tall kneeling position.
- With control, straighten your right leg and send it out to your right side.
- Reach down with your left hand to bring it just in front of your left thigh.
- Rotate your torso up toward the right, reaching your right arm toward the ceiling.
- Perform for reps, then switch sides. Keep your rep count even on both sides.
Coach’s Tip: Move slowly to ensure that you don’t use momentum to open up through your chest and thoracic spine. Let your torso take the lead in the rotation, not your shoulders.
Sets and Reps: Perform two to three sets of 10 reps per side.
Benefits of the Thoracic Rotation With Deep Lateral Kneel
- Since rotating isn’t a typical part of most strength athletes’ training routines, this movement will ensure that you’re getting 360 degrees of movement into your work.
- By incorporating side-to-side movement, you’ll also be integrating another under-utilized plane of motion (the frontal plane) into your workouts.
- This movement will challenge your balance and your core, helping you establish a stronger sense of coordination.
Lunge Rotation
You’ve started to rotate during a lateral lunge — now you’ll rotate with a regular forward lunge. All of these thoracic rotations combined with a lower body movement are designed to open your hips and thoracic spine all at once.
By improving both aspects of your mobility at the same time, you’re taking on two potential problems in your squat and deadlift all at the same time. Don’t be surprised if you start to see increases in your lower body numbers.
How to Do the Lunge Rotation
- Sink into a forward lunge with your right leg in front, such that both of your knees are at 90-degree angles.
- Make sure your hips are squared by pulling your left hip forward.
- Keep your chest tall. Extend both arms out to the sides.
- Slowly and with control, rotate your torso to your right until you’re facing the right side of the room.
- Maintain a tall chest and keep your hips stable throughout the movement. Perform for reps.
Coach’s Tip: Make sure you’re not yanking yourself through your range of motion. Let your torso lead instead of tugging with your shoulders.
Sets and Reps: Perform two to three sets of 10 reps per side.
Benefits of the Lunge Rotation
- This exercise challenges your hip mobility and thoracic mobility at the same time.
- Rotation is an often overlooked aspect of training, so you’ll be bringing a unique stimulus to your body.
- This move will help you improve your balance while opening up through your chest.
Deep Squat Rotation
If you need to improve your overhead stability, you’ll often start with your chest. Being able to reach overhead while also opening up through your chest plays a tremendous role in overhead stability. To a certain degree, the more mobile you are, the more stable you can train yourself to be in overhead positions.
Performing this move helps encourage the simultaneous ability to open up through your hips while also stretching your chest and shoulders. Developing this kind of thoracic mobility is essential for everything from a solid front-rack position to a killer overhead lunge.
How to Do the Deep Squat Rotation
- Sink into a deep squat with a neutral spine.
- Place your right elbow on the inside of your right knee so that your forearm and the upper arm are braced just below your knee and at your inner thigh.
- Rotate your torso up and to the left, bringing your left arm up toward the ceiling.
- Perform rotations for reps, increasing your range of motion with each rep.
Coach’s Tip: Aim to keep your hips squared and in the same position the entire time.
Sets and Reps: Perform two to three sets of 10 to 15 reps.
Benefits of the Deep Squat Rotation
- This move allows you to open up through your chest, which is a great counterbalance to spending a lot of time at a computer screen or on your phone.
- Combining shoulder mobility with a chest stretch can have tremendous benefits for your overhead positioning, including overhead squats and snatches.
- By sitting in a deep squat position the whole time, you’ll be training your body to become comfortable in a potentially compromising position. Hello, heavier, more confident squats.
Crab Chest Stretch
No crustaceans are required for this one, but you will need to get comfortable with being uncomfortable. The crab chest stretch is a part of the regular crab movements in animal flow-style exercise. But in this case, you’ll really lean back into your upper body and let the focus be on your chest.
Your hips will get a nice bonus stretch, as will your shoulders and even wrists. You’ll also be strengthening through your glutes and shoulders, so a little bit of everything happens with this one.
How to Do the Crab Chest Stretch
- Start by sitting on the ground with your knees bent and your hands palms down on the ground, just outside of your hips. Keep your thumbs close to your body so that they’re touching your hips, just underneath your shoulders. Your fingertips should be pointing toward your toes.
- Push your feet flat into the ground and press up with your hips to form a reverse bridge.
- Press up through your chest, pushing toward the ceiling as much as possible.
- Avoid gathering tension in your neck by softening the muscles of your face and keeping your shoulders away from your ears.
- Take deep breaths and hold the position for time.
Coach’s Tip: If the full move is too intense for you, it’s okay to keep your hips lower and just focus on pushing your chest up while your shoulders stay back and down.
Sets and Reps: Perform two sets of 10 to 20-second holds.
Benefits of the Crab Chest Stretch
- By pressing up through your chest while keeping your shoulder blades “in your back pockets,” you’ll produce an excellent stretch in your chest.
- This move is great for taking a break from office work to reverse that hunching motion over a computer or phone.
- You’ll also be stretching your wrists, hips, and shoulders while strengthening your upper and lower body.
Mobility Warm-Up
If you associate mobility exercises with your warm-up, you’re not wrong. So how do you warm up… for your warm-up?
You won’t need to do a formal warm-up, but even mobility exercises often require ramp-up sets or reps, too. Even the most flexible of gymnasts ideally don’t drop into their full range of motion completely cold.
Instead, start your reps with a gentle range of motion. With each rep — or breath, if you’re holding a static stretch for time — deepen your range of motion gradually. Whether you’re doing reps or timed holds, imagine your muscles lengthening on the in-breath and sinking deeper into the stretch on the out-breath.
How to Train Mobility
It’s all well and good to know that you need to do mobility training. It’s trickier to actually ensure that you’re doing it effectively. Here’s how to get started with your mobility exercises.
Mobility Exercise Selection
First things first: you need to choose which moves to integrate into your program. Especially if you’re new to mobility work, don’t feel the need to suddenly add every single mobility move into your regimen. Start slowly and prioritize what you’re currently lacking in your program.
Your hip mobility might be limited, for example. Prioritize two or three movements that open your hips and expose them to different stimuli and ranges of motion. The active frog and even deep squat rotations will do that for you. Deep squat rotations will also come in handy for opening up your thoracic spine and chest.
Prioritize exercises that match your current limitations and are connected to whatever lift you’re doing on any given day. Which joints will you be taxing in your workout today? Select exercises that target those joints.
Mobility Sets and Reps
How many sets and reps you’ll do in mobility training depends on the purpose of your movements at any given moment. Just like you perform different numbers of reps for building maximal strength than you go for max muscle-building, you’ll program differently here depending on your goals. Here’s how:
- For Warming Up: Perform 20 to 30 total reps (if relevant, keep it even on both sides) of dynamic stretches to your pre-lifting routine.
- For Cooling Down: Opt for static (still) stretches after your workout, performing one to two sets of 15 to 45 seconds of each stretch.
- For Intra-set Activation: Between strength sets, superset dynamic stretches. Perform 10 to 15 reps between each set.
- For Mobility-Specific Sessions: Begin with 20 to 30 total reps for each dynamic stretch, then transition to two sets of 30 to 60 seconds of static stretches.
Mobility Training Tips
For many athletes, mobility training is even harder to get into consistently than lifting a barbell. By nature, mobility training can be uncomfortable. You’re gradually moving your joints into ranges of motion that they tend to avoid.
Strength athletes are used to the discomfort of heavy barbell lifting, but they often embrace that grind. Mobility training requires a different threshold of tolerance for discomfort. Here’s how to embrace it.
Focus on Your Breathing
Whatever you do, don’t hold your breath. It’s tempting — especially if you’re panicking in a new range of motion — to stop breathing during mobility training. This is especially true for many athletes with static stretches that you hold for longer periods of time.
But instead, match your movements with your breath. Every time you inhale, imagine making your body longer. When you exhale, sink deeper into the position you’re in. This can give you something to focus on, and it will also signal to your body that it’s safe to relax into its current uncomfortable position.
Breathing will also ensure that blood and oxygen are flowing as effectively as possible, which is what you want during exercise generally and mobility training specifically.
Start Gradually
Even if you’re very experienced with mobility training, avoid going from zero to 60 immediately. Begin each set somewhat tentatively, and gradually — with each breath — sink into a deeper range of motion.
The same holds true for mobility training on a macro level. Start by getting yourself acclimated to two or three movements, performed with smaller rep counts and holds. Only once you feel comfortable should you add more time, reps, and exercises to the mix. Think of it as progressive overload and ramp-up sets for mobility exercises.
Be Consistent
It might be tempting to skimp on your warm-up or your mobility-specific training sessions. If that sounds like you, try integrating mobility exercises into your rest periods between strength sets. You won’t have to schedule in extra time — you’ll be taking rests in between sets anyway.
By working mobility into your rest periods, you’ll prime your muscles for the next set and make mobility training a habit. Hopefully, intra-set mobility exercises will get you increasingly comfortable with mobility training generally, such that you can integrate it into broader aspects of your fitness routine.
Benefits of Mobility Training
If you’ve ever experienced the crush of stiff muscles, you’ll love the primary benefit of mobility training. It helps you move in a greater range of motion without so much muscle stiffness. This helps improve your overall exercise performance by ensuring that your body can handle what you’re putting it through in training.
Become a Better Athlete
The ability to change direction quickly without sacrificing speed and quickness is important for a lot of sports and daily life activities. When your muscles are less stiff, your movements are easier and smoother. This translates into better movement mechanics on and off the platform. And the more efficiently you can move, the more effective your workouts will become.
Injury Prevention
Whether you’re running, lifting, jumping, or changing directions in daily life, you’re putting a lot of stress on your joints and muscles. When a joint moves through its full ROM, it improves its ability to absorb force. Therefore, a more mobile joint is generally a safer joint.
When your body has mobility restrictions, it will compensate and find a way to get the movement done. This leads to muscles and joints up and down the kinetic chain trying to do the work of your restricted joint. Over time, this can lead to injuries and pain.
Better Strength and Hypertrophy Potential
Having good joint mobility ensures that you’re able to move as efficiently as possible during your lifts. You won’t be improperly compensating for small ranges of motion, so you’ll be able to channel the forces you need to lift most effectively.
When you do that, you’ll be able to move heavier loads. This ability leads to more strength and better muscle-building potential.
For example, if your hip mobility is limiting your squat or deadlift, you’re not strengthening all parts of the movement and leaving gains on the table. Improving mobility is therefore a great way to get stronger without weights.
More Mobility Training Tips
With these 20 best mobility exercises and mobility programming tips, you’re not ready to set your joints up for success. Don’t be surprised if you can lift heavier the more you work on increasing your range of motion.
Now that you have a handle on the best mobility exercises to move and feel better, check out these other mobility-focused articles to help keep you in top form.
- Ankle, Knee, and Hip Mobility Checklist for the Overheat Squat
- Thoracic, Shoulder, Elbow, and Wrist Mobility Checklist for the Overhead Squat
- Strength Athletes: Don’t Overlook Your Wrists
Featured Image: baranq/Shutterstock