
There is rarely a strength athlete who has not experienced back pain at one point in their career. When it hits the pain can be so devastating, bending forward to pick a pencil off the ground can feel like the most daunting task in the world. Trust me, I’ve been there.
Today I’m going to share a simple step-by-step process I use to address pain & return to lifting heavy once again. This method is one that has helped me in my own career as an Olympic weightlifter and as a Doctor of Physical Therapy.
For me, addressing back pain starts with three simple steps:
- Remove the movement “trigger”
- Build core stability
- 10 minute walks
Editor’s note: This article is an op-ed. The views expressed herein and in the video are the author’s and don’t necessarily reflect the views of BarBend. Claims, assertions, opinions, and quotes have been sourced exclusively by the author.
Additional note: The content on BarBend is meant to be informative in nature, but it should not be taken as medical advice. The opinions and articles on this site are not intended for use as diagnosis, prevention, and/or treatment of health problems. It’s always a good idea to talk directly to a medical professional before beginning a new fitness, nutritional, and/or supplement routine, or when it comes to addressing injuries and/or recurring pain. If you feel you have recurring pain and/or an injury, please consult directly with a medical professional.
Step 1: Removing The Movement “Trigger”
My first step in addressing low back pain is to do an in depth self-analysis of what creates or “triggers” pain. Basically, we need to find out what makes pain worse. These are going to be the activities, movements and postures we assume throughout the day. Here is an example.
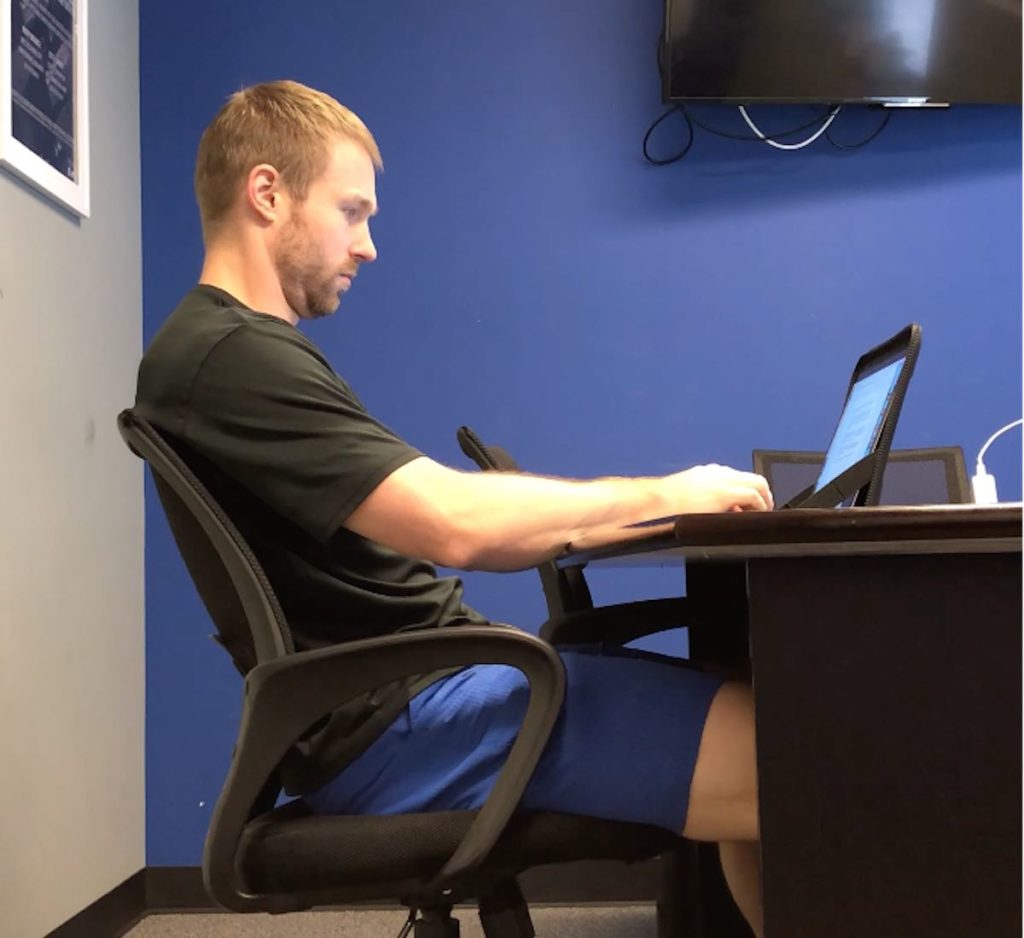
Think whether or not rounded (flexed) or extended postures or movements create or alleviate pain. For example, does sitting with a slouched rounded-back posture create pain? What about the action of bending forward to grab something off the ground? This is an example of a flexion related trigger.
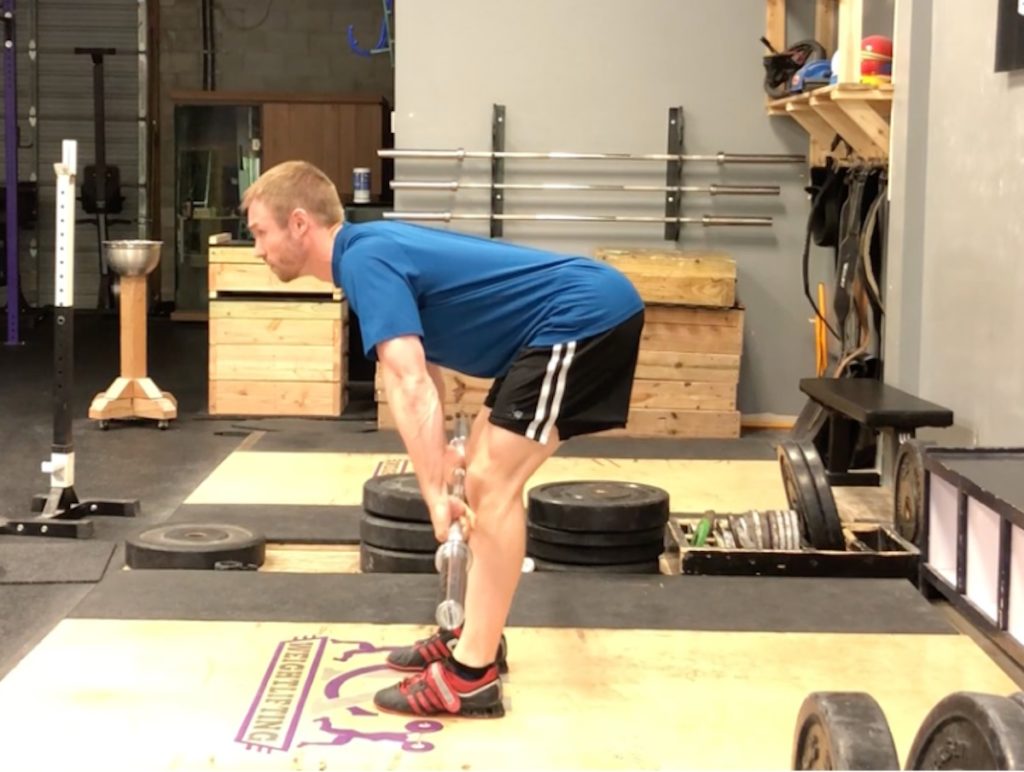
Now think to the movements we perform in the gym. Can we stand with a barbell by our waist and feel okay, but notice pain as soon as we hinge forward as if to perform an RDL? This is another sign the athlete may be dealing with a flexion related trigger. In my experience a “flexion intolerance” is the most common presentation for a strength athlete.
Next let’s try a simple test to confirm our hypothesis. One of the simplest screens to assess how the body responds to certain postures is to use a seated compressive test. This is a test I picked up from Dr. Stuart McGill, and have found it to be very helpful in the evaluation process with my patients.
Start by sitting on a stool with the arms by the side. Assume a good postured “tall” position with the spine in neutral. Next, grab the stool with the hands and pull upwards to compress the spine. Did this action create pain in the back? Next, perform the same pulling motion but this time round the lower back first. What happened? Was there pain in the back now that it we added a bit of compression in the rounded position?
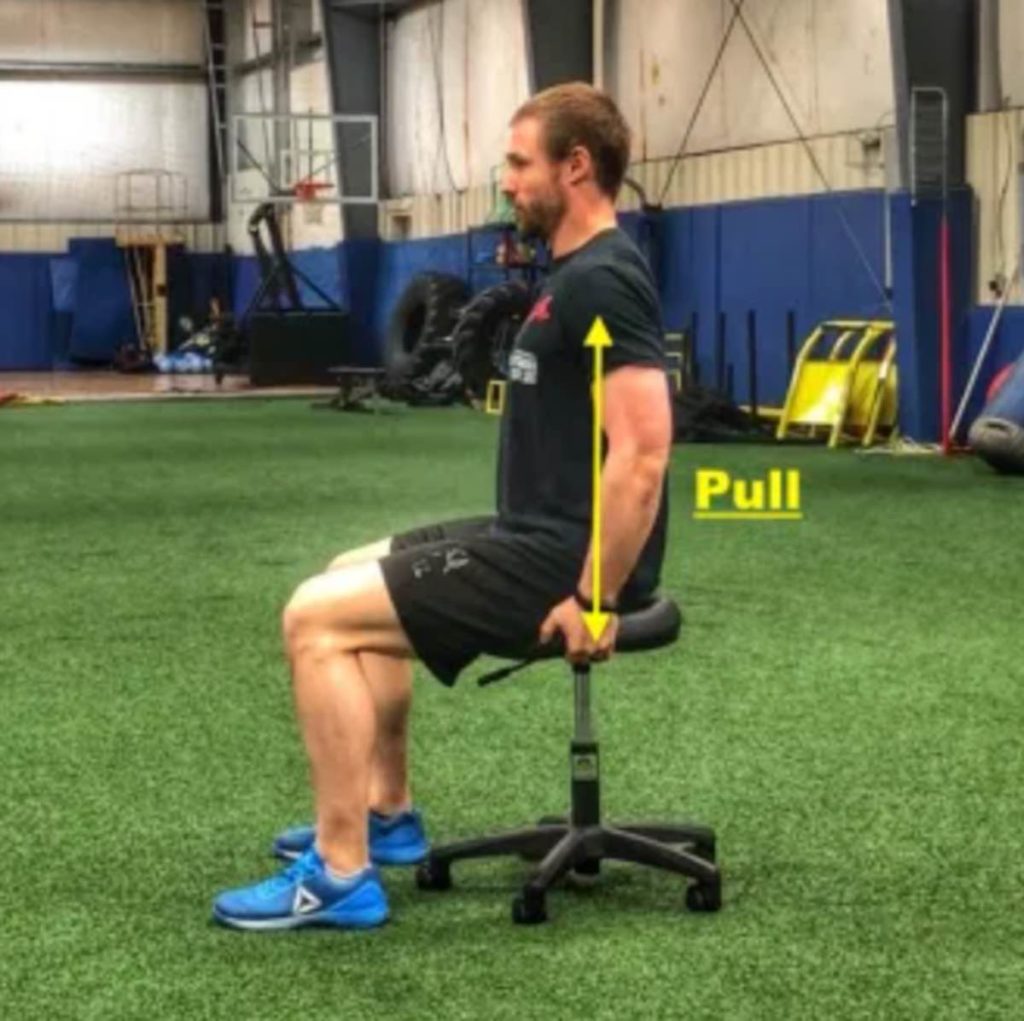
If there was pain that presented when rounding the back, pain is likely triggered with flexion or rounding of the spine (also known as a “flexion intolerance”).
How might we address this? When sitting, place a small towel roll under the low back to keep it from rounding. Sit up tall and don’t slouch! When picking things up from the ground (this goes for anything from a shoe to clothes out of a laundry basket) make sure to kneel instead of bending forward at the hips. If lying flat on the stomach feels good, be sure to spend a few minutes 2-3 times a day in that position.
The takeaway here is that addressing pain is just as much about what we don’t as it is what we do.
View this post on Instagram
Step 2: Build Core Stability
I’m also a big fan of regularly performing the McGill Big 3. This is a combination of three exercises from renowned back expert Dr. Stuart McGill that places very low load on the spine (meaning they can often be performed even by those with the most painful backs).
The Big 3 includes:
- Modified Curl Up
- Side Plank
- Bird Dog
I recommend performing 6 repetitions for 10 seconds holds of each movement to start. If we are in the right positions and performing them correctly, they should not recreate any symptoms.
Step 3: 10 Minute Walks
The last thing that can help many athletes is getting up and walking throughout the day. I like starting with smaller bouts of walking (5-10 minutes at first with a fast pace that causes us to swing our arms). The goal should be to eventually reach a 10-minute walk three times a day.
What To Avoid
In my opinion, we should not not waste time stretching the low back. When we stretch our low back, we stimulate the stretch receptors deep inside the muscles that give the perception of pain relief and the feeling of less stiffness.
I believe most of the muscle pain and stiffness we feel in the back is a consequence of a chemical reaction called inflammation. This inflammation can occur due to an injury located deeper in the spine (such as disc bulge, facet irritation, etc.). The underlying injury is what causes the secondary contraction or spasm of the surrounding muscles and pain.
Instead, I believe we should spend time stabilizing the core and moving more optimally rather than stretching the symptoms away.
Dr. Aaron Horschig is the founder of Squat University. His next book, ‘Rebuilding Milo,’ releases in early 2021.
Featured image: Flamingo Images/Shutterstock